Tuesday, August 30, 2011
Use Gmail as external hard drive 27 05 2008 // Use Gmail for backup? Yes, it is possible using this small extension, Get ready to start: Step 1: Download this Windows drive shell extension for windows users. I used it on windows XP pro and it works fine. Step 2: Install the extension by running the setup application. Step 3: A Gmail space appears in My Computers/Windows Explorer as an external drive as shown in the picture below. Step 4: Now double click on the external drive (GMail Drive) and a login screen will pop up, enter your user name and password. The extension is loading and enumerating the folder. Step 5: And now you can drag and drop your file to the drive, you can use it as a normal external drive. It sends an email to your GMail account with the file as an attachment. Enjoy ; ) The downside: These GMail storage solutions are very useful and until the much-rumored but slow-to-surface GDrive comes along and makes solutions trivial, the provide a nice way to access the same batch of files anywhere you are. However, there is a potential and significant downside. In the midst of my research with these tools, I ended up receiving the following dreaded “Unusual Usage” screen. I know that a lot of people use these tools regularly and have never seen any major problems, I me

Thursday, August 25, 2011
Enabling and Exploring god mode in windows 7

God Term is term that is defined by the Windows developers at the Microsoft which means to create that mode where all the settings can be accessed without any need to go through the browsing options through files and folders in the Control Panel. God Mode as the name suggest is not a part of any standard process of the operating system.
The God Mode hack of Windows 7 and Vista is a quick and easy way to make an interface that will show all the settings and values that are essential for the Windows.
To enable God Mode on Windows 7:
a. In any drive of your computer create a New Folder and rename it as GodMode.
b. Now append the string (without quotes) “.{ED7BA470-8E54-465E-825C-99712043E01C}” after the name of the folder so that the resultant string looks like “GodMode.{ED7BA470-8E54-465E-825C-99712043E01C}”

c. Once you renamed the folder, the icon of the folder will change automatically and the name will be changed to GodMode.


Tuesday, August 23, 2011
All Programs Open With Windows Media Player in Windows 7
Hello Friends,
I recently came across a problem in my friends PC, whenever we tried to execute any program (.exe) file it opens in to media player, I tried changing the file Association option available in Windows but it didn't help and then after lot of research found that its due to virus which changes the registry value and hence the problem.

So here's the fix how to solve this problem
Windows 7
Usage instructions
To fix the association for a particular file type, download the corresponding fix from the above links table (Use Right-click - Save as option in your browser to download the fixes). Unzip the fix and extract the .REG file to the Desktop. Right-click the REG file and choose Merge. Note that you need to be an administrator to apply these fixes.Click on the respective File association error and run the reg file to fix the error
- .avi file
- .bat file
- .bmp file
- .chm file
- cmd
- .com file
- Directory
- Drive
- .exe file
- Folder
- .gif file
- .html
- .ico file
- .img file
- .inf file
- .jpeg file
- .js file
- .lnk file
- .mp3 file
- .mpeg file
- .msc file
- .reg file
- .scr file
- .tif file
- .txt file
- .vbs file
- .wma file
- .wmv file
- .xml file
LOCK FOLDER WITH OUT ANY SOFTWARE

1. Make a folder on the desktop and name it as “folder”
2. Now, open notepad and write ren folder folder.{21EC2020-3AEA-1069-A2DD-08002B30309D} and now (Notepad Menu) File>save as.
3. In the ‘save as’ name it as lock.bat and click save ! (Save it on Desktop)
4. Now, again open notepad again and write ren folder.{21EC2020-3AEA-1069-A2DD-08002B30309D} folder and now (Notepad Menu) File>save as.
5. In the ‘save as’ name it as key.bat and click save ! (Save it on Desktop)
6. Now, double click lock.bat to lock the folder and now if you open your folder, control panel will open up !
7. Now, double click key.bat to open the folder and now if you open your folder, you can access your data inside the folder again !
8. Lock your folder and hide the key.bat somewhere else on your hard disk !
9. Whenever you want to open your folder just paste the key.bat on desktop and open your folder using it !
enjoy it!!
Saturday, August 20, 2011
Recover Deleted Files With Restoration
It is possible to recover deleted files if you haven’t saved much to the same drive that contains the deleted files. When you delete a file in Windows, it isn’t actually deleted – the data is still stored on the hard drive.
Since the information stored in the files hasn’t been removed from the hard drive, it may still be possible to retrieve the data from those lost files. This post explains how to use a tool called Restoration to recover deleted files, not only from a hard drive but other storage media such as memory cards as well.
Deleted Files Aren’t Really Deleted
One misconception is that once a file is deleted, it is gone forever. In the case of Windows, it may seem the file is gone, but in reality the data is still left on the hard drive.
When you delete a file, or directory, in Windows, the hard drive space that was used by the file is simply marked as available by changing a record in the file table. This change prevents the file from being displayed in Windows Explorer or “My Computer”. Since Windows doesn’t remove the contents of the file, it may be possible to recover a deleted file.
If you wish to recover a deleted file it is important that you don’t write any data to the drive that contains the file. The reason for this is because any new file can overwrite the data of the deleted file, since Windows has marked the hard drive space as free to use. So it is best to not use that drive if you plan to restore the file.
Restoration – A Simple Undelete Tool to Recover Deleted Files
There are many undelete tools available online – some are free while others require you to purchase them. In the steps I outline below I will use a small, free tool called Restoration, which was developed by Brian Kato.
I have used Restoration in the past to recover deleted files because it is small, so I can place the entire tool anywhere, it doesn’t require any installation, so I can run it from a flash drive, and it is simple to use (one window).
While it is a simple tool, and may not have all the bells and whistles of a much larger application, it can help you recover a file you have just deleted quickly.
Note:
Restoration only works on Microsoft Windows. I have tried it on XP, Vista, and Windows 7 without any issues.
Steps to Recover Deleted Files
To recover your deleted files with Restoration, use the following steps:
- Download Restoration and then unzip the contents.
Note:
To ensure you don’t overwrite any of the data from your delete files, unzip the contents of the zip file onto a separate drive.
- Run the “Restoration.exe” file to load the application. The Restoration application window should appear as below.

Restoration - Main Window
(Click to enlarge)
(Click to enlarge)
- Select the drive that contains the deleted file from the “Drives” dropdown list at the top-right.
- Click the “Search Deleted Files” button to begin searching the drive for any files that have been deleted. A progress bar will be displayed on the screen.

Restoration - Progress Window
(Click to enlarge)
(Click to enlarge)
- Once the scan is complete, the list in the window will populate with files and directories that have been deleted. You can click the column headings to sort the results list.
- To undelete a file, select it in the list and then click the “Restore by Copying” button on the right.
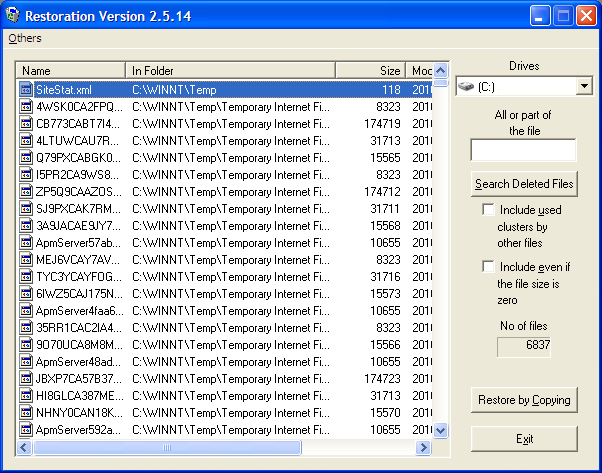
Restoration - Undelete File Selected
(Click to enlarge)
(Click to enlarge)
If the file contents still on the drive are intact, then you should be able to restore the file without any issues. If you have to recover deleted files for many files, I don’t think this tool allows you to select multiple files, at least not from what I have found. In a situation such as that, you may need another tool to restore large amounts of data.
While this tool is small and compact, it can help you recover deleted files.
Enable Windows 7 administrator account
How to enable Windows 7 administrator account
Method 1: Use Command Prompt
The easiest way to enable Windows 7 built-in administrator account is to use Command Prompt.
The easiest way to enable Windows 7 built-in administrator account is to use Command Prompt.
1. Click Start and type cmd in the search box. Right-click cmd and select Run as Administrator.
2. Click Yes when prompted to allow the Command Processor to run. And then the command prompt will appear.
3. Type net user in the command prompt window, and then hit Enter. All the Windows account user names will be listed. You'll also see the Administrator account, but now it is not enabled.
4. Type net user administrator /active:yes and hit Enter to enable Windows 7 admin account.

Assign a password for administrator:
Now the Windows 7 administrator account is created. To create a Windows 7 admin password, you can follow the below steps:
Now the Windows 7 administrator account is created. To create a Windows 7 admin password, you can follow the below steps:
1. Switch to log on with the administrator account.
2. Click Start, Control Panel, User Accounts and Family Safety and User Accounts in order. You'll enter the screen where you can make changes for your account.
3. Click Create a password for your account on the screen.

4. In the coming screen, type and confirm your Windows 7 admin password.
5. Enter password hint and click Create Password.
Now a password has been successfully created for your Windows 7 admin account.
Method 2: Use Local Users and Groups
1. Click Start and type lusrmgr.msc in the search box, and then hit Enter. The Local Users and Groups screen will come up.
1. Click Start and type lusrmgr.msc in the search box, and then hit Enter. The Local Users and Groups screen will come up.
2. Double-click the Users folder. And all the Windows 7 account will be displayed for you.

3. Right-click the Administrator account and select Properties.
4. Uncheck the "Account is disabled" check-box and click OK on the Administrator Properties screen.

Assign a password for admin:
Now Windows 7 admin account is enabled. To set a password for the enabled Windows 7 administrator account, follow the steps as below:
Now Windows 7 admin account is enabled. To set a password for the enabled Windows 7 administrator account, follow the steps as below:
1. Right-click the Administrator account and select Set Password.
2. Click Proceed to go on your operation.
3. Type and confirm your new Windows 7 admin password and click Ok.
4. Close the Local Users and Groups screen.

Now a password is assigned to your Windows 7 admin account.
Note: Please remember to create a Windows 7 password reset disk after assigning administrator password. It allows you to reset lost Windows 7 administrator password when you are locked out of computer.
Subscribe to:
Posts (Atom)